CoreOS is an open source container-optimised operating system, the first in its category. It is designed to allow dynamic scaling and management of computing capacity along with an emphasis on security, consistency, and reliability. This get-started-guide is aimed to help anyone at setting up their first CoreOS cluster and getting familiar with the main systems.
Requirements
- A single Container instance (1 GB of RAM will work fine)
Usually, the process of setting up a cluster would start by deploying a number of new hosts and having to connect the cluster manually. With a CoreOS cluster, the majority of the configuration is done even before the first server gets booted up. This works through a script called cloud-config, which defines the required parameters and starts the essential processes during each boot-up sequence.
Cloud-config
The cloud-config file can be passed onto the server at deployment. It allows automating the first-time setup on any Linux host, but more importantly, has it’s own use case with CoreOS servers.
Name the script in the first field and then enter the segments in the script field as shown in the example below. Make sure to include the #cloud-config on the first line so that the system recognises the script.
#cloud-config
coreos:
  etcd2:
    discovery: https://discovery.etcd.io/
    advertise-client-urls: "http://$private_ipv4:2379"
    initial-advertise-peer-urls: "http://$private_ipv4:2380"
    listen-client-urls: "http://0.0.0.0:2379,http://0.0.0.0:4001"
    listen-peer-urls: "http://$private_ipv4:2380,http://$private_ipv4:7001"
    data-dir: /var/lib/etcd2
  fleet:
    public-ip: $private_ipv4
    etcd_servers: "http://$private_ipv4:2379"
  units:
    - name: etcd2.service
      command: start
    - name: fleet.service
      command: start

ssh_authorized_keys:
  - SSH key
Note that the example contains two placeholders marked with angle brackets. These parts will require some attention before you can deploy the cluster and will be explained next.
Discovery token
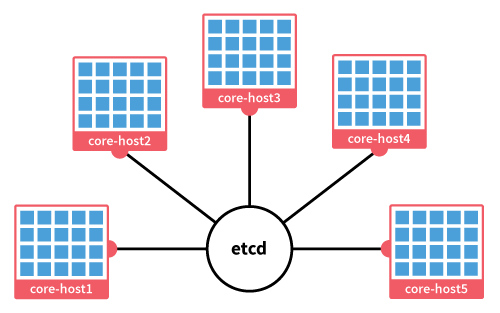
The automated node discovery works through CoreOS hosted discovery service. To start off, you will need to decide the initial size of your CoreOS cluster. Commonly 3 nodes are considered the minimum without any upper limit. The number of nodes is sent to the automated discovery backend when creating a new discovery token.
Choose the cluster size by the number of servers you intend to deploy to it. This is important as the etcd2 service will not start until the requirement set by the token is fulfilled, and additional nodes past the cluster size will be assigned as proxies.
To generate a new token, open the URL below in your web browser or fetch the token using curl. Use a number at the end of the address according to your intended cluster size.
$ https://discovery.etcd.io/new?size=3
https://discovery.etcd.io/8330c2f3064df11f38a68d6ce68adcf0
Copy your new token code into the cloud-config script by replacing the with the code at the end of the address. Each node will need to use the same discovery token to be able to join the cluster.
SSH keys
You also have the option to include an SSH key to the core default username. This is recommended for security and ease of use. To add your public SSH key, replace the in the cloud-config with your key.
You can find out more about SSH keys and How To Enable Remote SSH log in for LetsCloud Container Servers. If you do not wish to include an authentication key at this time, you can ignore the ssh_authorized_keys section or delete it altogether. Use passwd core command to set a password to the core username manually after first boot-up.
Step 1 - Deploying nodes
The etcd2 settings in the cloud-config define a number of URLs that the nodes will use to communicate with clients and each other. When the cloud-config file is read at boot, the system generates a network settings file, which is saved as the following: /run/systemd/system/etcd2.service.d/20-cloudinit.conf
To simplify the deployment process the script allows the use of variables. The $private_ipv4 and $public_ipv4 substitution variables are replaced with the server specific details when the cloudinit file is generated.
Once you are done with the server configurations and the cloud-config file is ready to go, hit the Deploy server button at the bottom of the page.
The cluster discovery service needs the minimum amount of servers defined by the token (default 3), as etcd2 will not start until the requirement is fulfilled. Any additional nodes past the cluster size will be assigned as proxies. The cluster size can always be changed later using the fleet commands. Repeat the deployment steps until you have enough nodes joined to the cluster. You can check the nodes that have been discovered through your browser using your discovery token URL like the one below.
https://discovery.etcd.io/030b70ad811b6ce1d6de052b49d84728
Each joined node will appear in the list similarly to the example at the above link.
Step 2 - Checking the cluster
When you have deployed the nodes for your cluster, continue with the configuration by connecting to each node using SSH. If you added an SSH key to the cloud-config file, you can use it with the core username and the authentication key.
CoreOS employs automated update services and as such usually does not require attention except for occasional reboots. However, when deploying a new cluster it is useful to make sure all of the nodes are running the latest version. Run a manual update to ensure your nodes are using the same software.
$sudo update_engine_client -update
Once the update process is complete, restart the servers to apply the changes.
When the nodes are back online again, check that the etcd is working correctly on all servers.
$    etcdctl cluster-health
member 7049b823bb97d37 is healthy: got healthy result from http://10.1.6.96:2379
member 26be7ca2412d8183 is healthy: got healthy result from http://10.1.1.183:2379
member 8c30098130e80648 is healthy: got healthy result from http://10.1.6.47:2379
cluster is healthy
See that all of your nodes are reporting healthy results to the cluster, and when they are, you can continue below with docker and fleet tests.
Troubleshooting and other helpful info If a node is unable to communicate with the cluster through etcd, it is likely the service is not running correctly or at all. Try restarting the etcd2.service with the command below
$sudo systemctl restart etcd2
If you had to restart the etcd, the fleet services will need to be started up as well.
$sudo systemctl restart fleet
You can check the journal entries to further troubleshoot issues, for example with etcd2 using the following command.
$sudo journalctl -f -t etcd2
If you need to make changes to your cloud-config, it can be found at /etc/upcloud_userdata. Any edits to the cloud-config are automatically updated at each boot, but the update can also be run manually with the command below.
$sudo coreos-cloudinit --from-file=/etc/upcloud_userdata
You can then check that the IP addresses are detected correctly by reading the cloudinit file.
$cat /run/systemd/system/etcd2.service.d/20-cloudinit.conf
If you need to reconfigure the cluster, always use a new discovery token as they are one-time use only. You will also need to delete the old cluster information from the etcd2 data directory.
$sudo rm -rf /var/lib/etcd2/
The cluster member information will be generated again when the node joins the cluster.
Step 3 - docker
Containers are the main component of CoreOS. The lightweight operating-system-level virtualization method allows applications to be encapsulated and ran in practically any environment. CoreOS ships with the popular container solution, docker, pre-installed and good to go out of the box.
$docker pull busybox
Then run the container in the interactive mode with the options as shown below. This will start the busybox container, names it bb1, and leaves it open on the command line.
$docker run -it --name bb1 busybox
You can then test out the container as you wish. Once you are done, exit the container with either pressing Ctrl+P Ctrl+D or with the usual Linux terminal command below.
$exit
In this example, the container shuts down after the terminal is close, but does not remove itself automatically. You can see the stopped containers with the following command.
$docker ps --all
If you wish to start and enter the container again, use the interactive parameter as below
$docker start -i bb1
Or remove the container when you no longer need it.
$docker rm busybox1
Running docker manually is simple, yet managing a whole cluster this way would be time-consuming. To avoid having to start each container by hand CoreOS utilises fleet. Continue below to learn how fleet works and how to use it.
Step 4 - fleet
Fleet is the cluster management interface that controls the individual systemd environments on nodes through unit files. It can be accessed on any of the nodes in the cluster or even remotely using the fleetctl utility tool.
The easiest way to use fleetctl is while connected to one of the nodes in your cluster. For example, you can check that all of your nodes are reporting to fleet with the command below.
$    fleetctl list-machines
MACHINE      IP          METADATA
2e20446e...  10.1.6.11   -
a6eb210a...  10.1.5.151  -
de064c45...  10.1.2.103  -
If a node failed to report in, or you got an error retrieving the list of active machines, try restarting the etcd2 and fleet services on the problematic node, or check above in the troubleshooting section for further options.
$sudo systemctl restart etcd2 fleet
When all of your nodes are listed correctly you can continue with creating your first service. Understanding how Docker works in the earlier example will help with systemd unit files and fleet. In essence, the unit files are a set of instructions of what the container needs to run.
To test fleet, create a simple service file and run it on the cluster.
$vi hello.service
Then add the following into the file, save it and exit.
[Unit]
Description=Hello World from busybox
After=docker.service
Requires=docker.service

[Service]
TimeoutStartSec=0
ExecStartPre=-/usr/bin/docker kill bb1
ExecStartPre=-/usr/bin/docker rm bb1
ExecStartPre=/usr/bin/docker pull busybox
ExecStart=/usr/bin/docker run --name bb1 busybox /bin/sh -c "trap 'exit 0' INT TERM;
while true; do echo Hello World!; sleep 1; done"
ExecStop=/usr/bin/docker stop bb1
The unit file above defines a busybox container as a service and runs it with a simple Hello World print out script until stopped.
Note that if you are familiar with docker and have run docker commands previously, be sure not to copy a docker run command that starts a container in detached mode (-d). Detached mode won’t start the container as a child of the unit’s process id. This will cause the unit to run only for a few seconds and then exit.
Load the service with the following command.
$fleetctl load hello.service
You can check the service currently loaded or running.
$fleetctl list-units
Then start the service with the command below.
$fleetctl start hello.service
Since this time, the busybox container is running as a service, it will not open in a terminal. Furthermore, the container might not even be running on the same node you are commanding the fleet from, but instead somewhere else on the cluster. Check the node that is hosting the hello.service with the listing command again.
$fleetctl list-units
To see what the container is doing, use the fleet journal command. Note that on clusters with authentication keys enabled, you will need to allow agent forwarding for the fleet journal and ssh commands to work. On Linux systems use the options -A when connecting through SSH, or with PuTTY SSH client the option can be found under Connections > SSH > Auth.
$fleetctl journal hello.service
You should see a printout of “Hello World” repeating in the logs. If that is the case the container was configured correctly and started without issues. You can then shut down the process and remove the container.
$$fleetctl stop hello.service
fleetctl destroy hello.service
With the test service removed, you are done with this tutorial. You now have a simple CoreOS cluster ready for more interesting configurations.
Conclusion
Deploying a CoreOS cluster is fast and easy with cloud servers. Automated node discovery and simple configuration through the cloud-config file allow you to be up and running in minutes even with larger clusters. Getting to know the basic tools of CoreOS is also effortless and gives anyone the power of scalable distributed computing. Whether you are planning to develop new containerized applications or looking to utilise some of the many already available container optimised services, CoreOS clusters will allow you to realise your vision.






0 COMMENTS