

Introduction
WordPress is the most popular CMS (content management system) on the internet. It allows you to easily set up flexible blogs and websites on top of a MySQL backend with PHP processing. WordPress has seen incredible adoption and is a great choice for getting a website up and running quickly. After setup, almost all administration can be done through the web frontend.
In this guide, we'll focus on getting a WordPress instance set up on a LAMP stack (Linux, Apache, MySQL, and PHP) on an Ubuntu 18.04 server.
Prerequisites
To complete this tutorial, you’ll need:
- Create a sudo user on your server;
- Install a LAMP stack;
- Secure your site with SSL.
Step 1 - Creating a MySQL Database and User for WordPress
You already have MySQL installed, but you have to create a database and user for WordPress to use.
The first step is to log into the MySQL root account with this command:
$mysql -u root -p
Create a database for WordPress by entering the command:
mysq>mysql> CREATE DATABASE wordpress DEFAULT CHARACTER SET utf8 COLLATE utf8_unicode_ci;
Now, to create an account, set a password, and give access to the database, use the following command:
mysq>mysql> GRANT ALL ON wordpress.* TO 'wordpressuser'@'localhost' IDENTIFIED BY 'password';
With the database created specifically for WordPress, you’ll have to flush the privileges so that the MySQL instance knows about the recent changes you’ve made:
mysq>FLUSH PRIVILEGES;
Quit MySQL:
mysq>EXIT;
Step 2 - Installing Additional PHP Extensions
You can download and install some popular PHP extensions to use with WordPress with the following commands:
$$sudo apt update
sudo apt install php-curl php-gd php-mbstring php-xml php-xmlrpc php-soap php-intl php-zip
Now restart Apache to load the extensions in the next section:
$sudo systemctl restart apache2
Step 3 - Adjust Apache’s Configuration to Allow for .htaccess Overrides and Rewrites
This step consists in making some adjustments to your Apache configuration. Naturally you should have a configuration file for your website in the /etc/apache2/sites-available/ directory. Create your own and substitute when following this step.
Also, don’t forget to create a root directory to WordPress install.
Enabling .htaccess Overrides
The use of .htaccess files will be disabled, which needs to be changed once WordPress and some plugins will use these files for in-directory tweaks to the web server’s behavior.
First, open the Apache settings file for your site:
$sudo nano /etc/apache2/sites-available/wordpress.conf
You’ll need to set the AllowOverride directive within a Directory block pointing to your document root to allow the access we need. Put the following text inside the VirtualHost block in the settings file, ensuring to use the correct web root directory:
/etc/apache2/sites-available/wordpress.conf
<Directory /var/www/wordpress/> AllowOverride All </Directory>
After that, just save and quit the file.
Enabling the Rewrite Module
To enable mod_rewrite and enable the utilization of WordPress permalink feature, use the following command:
$sudo a2enmod rewrite
Enabling the Changes
Before implementing the changes, ensure that there are no mistakes by checking what you’ve done:
$sudo apache2ctl configtest
The output should show a message like this:
  AH00558: apache2: Could not reliably determine the server's fully qualified domain name, using 127.0.1.1. Set the 'ServerName' directive globally to suppress this message
Syntax OK
If you want to suppress the top line, just add a ServerName directive to your main Apache configuration file at /etc/apache2/apache2.conf. This is just a message however and doesn't affect the functionality of our site. As long as the output contains Syntax OK, you are ready to continue.
Next, restart Apache to implement the changes:
$sudo systemctl restart apache2
Step 4 - Download WordPress
Now that you have your server configured, you shall download and set up WordPress. It is recommended to get the latest version of WordPress from their site for security reasons. Change into a writable directory and then download the compressed release by issuing:
$cd /tmp
$curl -O https://wordpress.org/latest.tar.gz
Extract the compressed file to create the WordPress directory structure:
$tar xzvf latest.tar.gz
You will be moving these files into our document root momentarily. Before you do, you can add a dummy .htaccess file so that this will be available for WordPress to use later.
Create the file:
$touch /tmp/wordpress/.htaccess
Also, copy over the sample configuration file to the filename that WordPress actually reads:
$cp /tmp/wordpress/wp-config-sample.php /tmp/wordpress/wp-config.php
You can also create the upgrade directory, so that WordPress won't run into permissions issues when trying to do this on its own following an update to its software:
$mkdir /tmp/wordpress/wp-content/upgrade
You can copy the entire contents of the directory into our document root. We are using a dot at the end of our source directory to indicate that everything within the directory should be copied, including hidden files (like the .htaccess file you created):
$sudo cp -a /tmp/wordpress/. /var/www/wordpress
Step 5 - Configuring the WordPress Directory
Next step is to make some adjustments in your WordPress directory.
Adjusting the Ownership and Permissions
You can start by giving all files’ permissions and ownership to the www-data user and group. This is the user that Apache runs, and it will need to have permission to read and write WordPress files in order to serve the website and perform automatic updates.
Update the ownership with chown:
$sudo chown -R www-data:www-data /var/www/wordpress
Next we will run two find commands to set the correct permissions on the WordPress directories and files:
$$sudo find /var/www/wordpress/ -type d -exec chmod 750 {} ;
sudo find /var/www/wordpress/ -type f -exec chmod 640 {} ;
These should be a reasonable permissions set to start with. Some plugins and procedures might require additional tweaks.
Setting up the WordPress Configuration File
It’s also necessary to make some changes to the main WordPress configuration file.
When you open the file, the first order of business will be to adjust some secret keys to secure the installation. WordPress provides a secure generator for such values so that you won’t have to try to come up with values on your own.
To grab secure values from the WordPress secret key generator, type:
$curl -s https://api.wordpress.org/secret-key/1.1/salt/
You will get back unique values that look something like this:
Attention! It is important that you request unique values each time. Do NOT copy the values shown below!
 define('AUTH_KEY',         '1jl/vqfs<XhdXoAPz9 ``DO NOT COPY THESE VALUES ``c_j{iwqD^<+c9.k<J@4H');
define('SECURE_AUTH_KEY',  'E2N-h2]Dcvp+aS/p7X ``DO NOT COPY THESE VALUES`` {Ka(f;rv?Pxf})CgLi-3');
define('LOGGED_IN_KEY',    'W(50,{W^,OPB%PB<JF ``DO NOT COPY THESE VALUES ``2;y&,2m%3]R6DUth[;88');
define('NONCE_KEY',        'll,4UC)7ua+8<!4VM+ DO NOT COPY THESE VALUES #`DXF+[$atzM7 o^-C7g');
define('AUTH_SALT',        'koMrurzOA+|L_lG}kf DO NOT COPY THESE VALUES  07VCLjlD&?3w!BT#-');
define('SECURE_AUTH_SALT', 'p32*p,]z%LZ+pAu:VY DO NOT COPY THESE VALUES C-?y+K0DK_+F|0h{!_xY');
define('LOGGED_IN_SALT',   'i^/G2W7!-1H2OQ+t$3 DO NOT COPY THESE VALUES  t6**bRVFSD[Hi])-qS`|');
define('NONCE_SALT',       'Q6]U:K?j4L%Z]}h^q7 DO NOT COPY THESE VALUES 1% ^qUswWgn+6&xqHN&%');
These are configuration lines that you can paste directly in our configuration file to set secure keys. Copy the output you received now. Now, open the WordPress configuration file:
$sudo nano /var/www/wordpress/wp-config.php
Find the section that contains the dummy values for those settings. It will look something like this:
/var/www/wordpress/wp-config.php
. . .
define('AUTH_KEY', 'put your unique phrase here'); define('SECURE_AUTH_KEY', 'put your unique phrase here'); define('LOGGED_IN_KEY', 'put your unique phrase here'); define('NONCE_KEY', 'put your unique phrase here'); define('AUTH_SALT', 'put your unique phrase here'); define('SECURE_AUTH_SALT', 'put your unique phrase here'); define('LOGGED_IN_SALT', 'put your unique phrase here'); define('NONCE_SALT', 'put your unique phrase here');
. . .
Delete those lines and paste in the values you copied from the command line:
/var/www/wordpress/wp-config.php
. . .
define('AUTH_KEY', 'VALUES COPIED FROM THE COMMAND LINE'); define('SECURE_AUTH_KEY', 'VALUES COPIED FROM THE COMMAND LINE'); define('LOGGED_IN_KEY', 'VALUES COPIED FROM THE COMMAND LINE'); define('NONCE_KEY', 'VALUES COPIED FROM THE COMMAND LINE'); define('AUTH_SALT', 'VALUES COPIED FROM THE COMMAND LINE'); define('SECURE_AUTH_SALT', 'VALUES COPIED FROM THE COMMAND LINE'); define('LOGGED_IN_SALT', 'VALUES COPIED FROM THE COMMAND LINE'); define('NONCE_SALT', 'VALUES COPIED FROM THE COMMAND LINE');
. . .
Next, it’s necessary to modify some of the database connection settings at the beginning of the file. You need to adjust the database name, the database user, and the associated password that we configured within MySQL.
The other change you need to make is to set the method that WordPress should use to write to the filesystem. Since you’ve given the web server permission to write where it needs to, you can explicitly set the filesystem method to "direct". Failure to set this with your current settings would result in WordPress prompting for FTP credentials when you perform some actions.
This setting can be added below the database connection settings, or anywhere else in the file:
/var/www/wordpress/wp-config.php
. . .
define('DB_NAME', 'wordpress');
/** MySQL database username */ define('DB_USER', 'wordpressuser');
/** MySQL database password */ define('DB_PASSWORD', 'password');
. . .
define('FS_METHOD', 'direct');
Save and close the file when you are finished
Step 6 - Completing the Installation Through the Web Interface
After the server configuration is complete, it’s time to finish the installation through the web interface. In your web browser, navigate to your server's domain name or public IP address:
https://server_domain_or_IP
Select the language you would like to use:

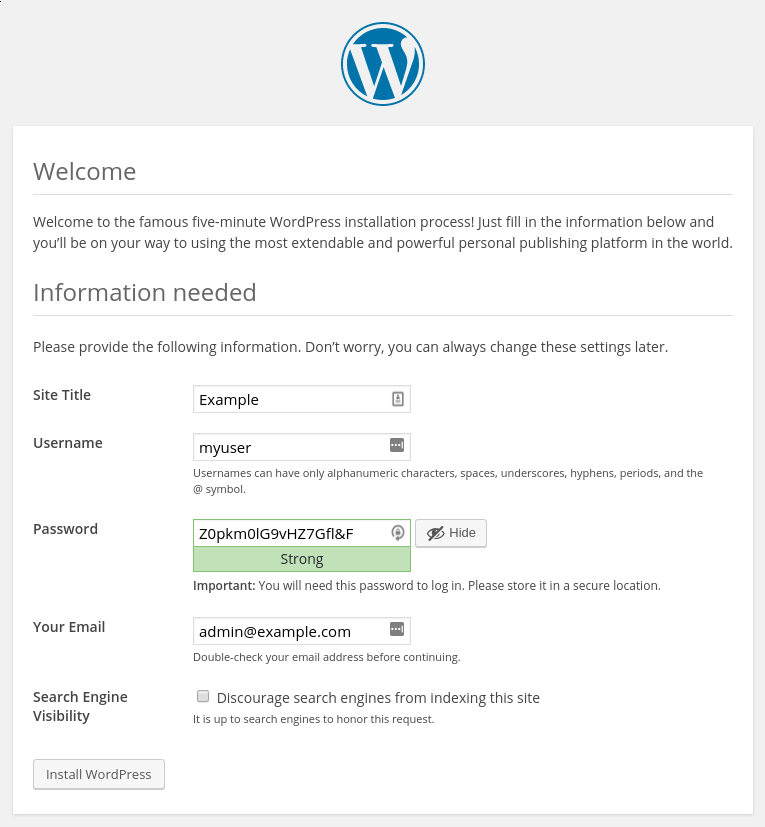
Next, you will come to the main setup page.
Select a name for your WordPress site and choose a username (it is recommended to choose something robust for security purposes). A strong password is generated automatically. Save this password or select an alternative strong password.
Enter your email address and select whether you want to discourage search engines from indexing your site:
When you click ahead, you will be taken to a page that prompts you to log in:

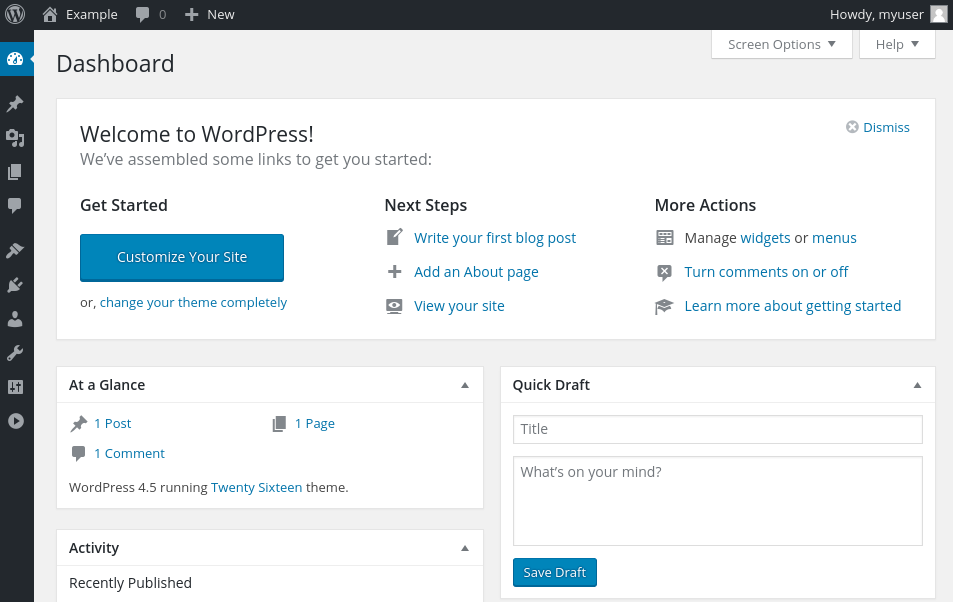
Next, you will be taken to the WordPress administration dashboard:
Conclusion
If you got here, you might have installed your WordPress and it’s ready to be used! If you have any question about this tutorial, leave it in the comment area below.


 on Ubuntu 24.04")


0 COMMENTS